Getting Started with LoadRunner, Eclipse and Selenium
Before you begin, save yourself some time and make sure that you're using the 32bit version of Eclipse
- . I actually had an issue getting this to work at first, and had to open a ticket with HP support. The resolution was changing to 32bit Eclipse, after which everything worked fine.
Also — you need LoadRunner 12, but the good news is that LoadRunner 12 is now free to use for up to 50 concurrent users. So go ahead and download and follow along – it's free.
Install the LoadRunner Eclipse Add-in
- First, run the LREclipseIDEAddinDevSetup.exe from the LR install under Additional Components\IDE Add-Ins DEV

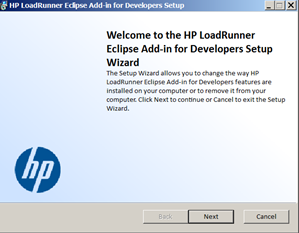
- The HP LoadRunner Eclipse Add-in for Developers Setup should appear. Click Next.
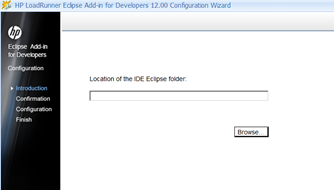
- Point to the location where you have the eclipse.exe located.
- Take the rest of the defaults.
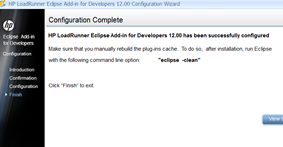
- Once the wizard is completed, run the eclipse-clean option from either the command line or by adding the –clean in the target clause (I find this way easier).
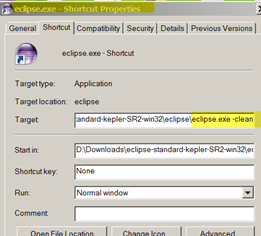
- Using the –clean parameter will force Eclipse to rebuild your plugin cache.
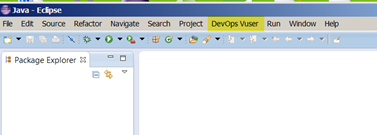
- Once Eclipse starts up you should have a new menu option named DevOps Vuser
Create a Selenium test in LoadRunner
Cool! Now that we have everything configured, let's create a simple selenium script and add some LoadRunner transactions to it. I'll assume that you already have a project that includes the Java Selenium language bindings. (If not, you can get step-by-step instructions on how to do this by following my previous post Selenium 2.0 WebDriver – How to Get Started with Eclipse.)
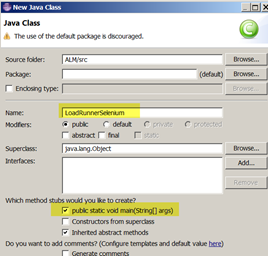
- In your Eclipse project, create a New Java Class named LoadRunnerSelenium. Be sure to select the public static void main checkbox option.
- Add the following imports:
import org.openqa.selenium.WebDriver;
import org.openqa.selenium.firefox.FirefoxDriver;
import org.junit.Assert;
- Add the following code under your void main:
WebDriver driver = new FirefoxDriver();
driver.get("http://www.google.com");

Assert.assertEquals("Google", driver.getTitle());
driver.quit();
- Run the test and make sure it passes
Adding LoadRunner Transactions to Selenium Script
Now let's add some LoadRunner transactions. A LoadRunner transaction is a step added to a script that measures one or more actions. Without transactions, LR would not be able to take measurements.
For our script we will be using the Start and End transaction steps. These transactions are used to measure the duration of a particular flow or event. In our example it will measure the amount of time it takes for the Google homepage to load.
- In Eclipse, under DevOps Vuser, select the Add LoadRunner API Reference to Project option.

- You should now have the import statement at the top of your script. (If you don't, just type it in.)
import lrapi.lr;
- Add an lr.start_transaction(“Google_Search_Page”) right before our assert statement.
- Add an lr.end_transaction(“Google_Search_Page”, lr.PASS); make sure the transaction names are exactly the same.
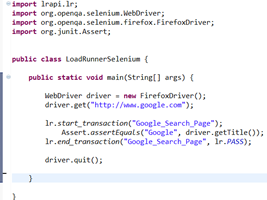
- After the end transaction, add driver.quit();
- From the Devops Vuser menu, select Run Vuser
- The test should now run without issues.
Run the Selenium test from LoadRunner Controller
Now that we have our script, we can create a performance test scenario to run within the LoadRunner controller. The HP LR Controller is used to organize and manage scenarios. It is basically our performance test dashboard. In the controller is where we can specify our scripts and how many concurrent users to run. It also allows us to display the execution status of each Vuser and monitor performance resources.
In Eclipse, select the DevOps Vuser>Launch Controller option:

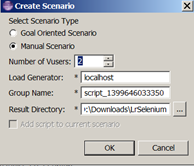
- In the Create Scenario dialog, enter:
- Select Manual Scenario
- Number of Vusers 2
Result Directory: I have mine in D:\Download\LrSelenium
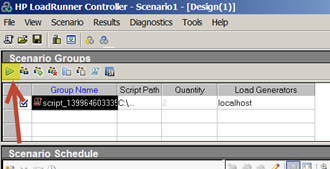
- In the HP LoadRunner Controller, click on Run (the default run time is 5 minutes).
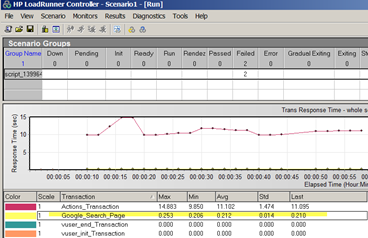
The test scenario should run for the specified time, and you'll also be able to see how long the avg time for the Google_Search_Page was.
We don't have time today to go into all the different settings you can set in the controller, but you should now have the knowledge needed to create some basic Selenium scripts and run them in LoadRunner.


where to find this LREclipseIDEAddinDevSetup.exe? thanks.
Under the LoadRunner 12 install Additional Components\IDE Add-Ins DEV directory
Installed the plugin (java 1.8, win-7 64bit), but it’s not working…
the button there, but nothing happens when u press it.
Any way to use lr functions with the plugin-install? what jars/libs to import to eclipse?
Thanks,
Asher
Any document on alternatives ways to create script with LR calls, without plugin installation (it’s not working)?
Need assist here. Not working
What version of eclipse are you using 64bit or 32bit? It only works with 32bit
I have the same issue with Asher. I use eclipse 64bit too. The menu is there but nothing here. However, I can add LoadRunner library by right click on the project. But I CANNOT run the test like you did. Please help!!!
Hi – maybe I’m confused. At the start of the post I state that this will only work with 32bit version of Eclipse NOT 64bit
. I spoke with HP and they confirmed this.
So what version of Eclipse are you using — 64bit? Since it sounds like you have 64bit I would expect it not to work since it only works with 32bit. Am I not understanding your problem?
Hi Joe,
Great article but I am getting similar behaviour to the others, and I have triple checked that I have the 32 bit version of Eclipse (Luna v4.4.0).
The DevOps Vuser menu heading appears, but nothing happens when you click it. On a hunch, I re-started Eclipse (with the -clean option) and started a new project from scratch. The DepOps Vuser menu would expand, but none of its menu items were active or clickable. I restarted again with the same new project and now its gone back to the original ‘nothing happening’ from the main Devops Vuser menu heading.
Ideas?
Oh, also, manually typing “import lrapi.lr;” doesn’t work because lrapi cannot be resolved. I would add a jar in the build path if I knew which jar to add. Any idea?
Please note, this has happened for two separate machines, both with new instances of 32 bit Eclipse installed.
Hi Martin – I need to try on clean machine to see if I can repro.
Where, how do you perform the imports referenced?
import org.openqa.selenium.WebDriver;
import org.openqa.selenium.firefox.FirefoxDriver;
import org.junit.Assert;
Disregard previous question. Had to manually type import lrapi.lr;
I get this msg when running the vuser
Description Resource Path Location Type
The import lrapi.lr is never used LoadrunnerSelenium.java /SeleniumIE/src line 1 Java Problem
import lrapi.lr;
import org.openqa.selenium.WebDriver;
import org.openqa.selenium.firefox.FirefoxDriver;
import org.junit.Assert;
public class LoadrunnerSelenium {
public static void main(String[] args) {
// TODO Auto-generated method stub
WebDriver driver = new FirefoxDriver();
driver.get(“http://www.google.com”);
lr.start_transaction(“Google_Search_Page”);
Assert.assertEquals(“Google”, driver.getTitle());
lr.end_transaction(“Google_Search_Page”, lr.PASS);
driver.quit();
}
Great Post!
How is the processor/memory foot print for selenium script, if we run 50 concurrent users thro single LG.
I am sure, it would be high compared to web/http protocol.
Hi,
Do we need separate license to run this is Controller?
LoadRunner 12 has a free 50 concurrent user license that includesthe controller. But I think I made a mistake I don’t think that the GUI Vuser (Selenium type) is included in that free license.
Hi Joe,
Nice article. I am having some problem. When i try to perform the following step “From the Devops Vuser menu, select Run Vuser” , i get error “Unable to create a script”. Could you please tell me what i am doing wrong here ? I am using Luna 32 Bit and Loadrunner 12.02.
Regards
Amit
I am getting You do not have a license for this Vuser type.Please contact HP Software to renew your license. error while executing the test from Controller on LR 12.02 Trial version with single user
Does Selenium has a think client side for virtual users come pared to http v users? I know Selenium talks to the browser API’s.
I think the issue is that I originally thought that the new Loadrunner 50 free license would include a GUI user license but it appears this is not the case.
HI,
I didnt find the LREclipseIDEAddinDevSetup.exe while installing load runner v 12.2 community edition can u help me out..
Hi Joe,
I am trying install the eclipse add in a machine which has 64-bit operating system. But unable to see the Eclipse – IDE under program files.
Can you please help?
Do a search for eclipse.exe on your computer
Hi Joe,
It’s a nice article. I was able to integrate it succesfully and run the scripts written in java. But, we have some scripts written in Python. Can we integrate Python Scripts with Load Runner. Seems like its not working for me.
It would be helpful if you can share your thoughts on this.
Thanks,
Srini.
I was never able to get this to work by installing the plugin (options just aren’t there). You CAN manually add the libraries to your drop in folder in eclipse. Create new project and expand the loadrunner node to select a vuser script. When you go into your workbench you will see VUSER in your menu bar. You can then edit the vuser_end vuser_start and Action files in Eclipse.
Go to project properties and the Add LR Api Reference is at the bottom.
Good Luck – it’s touchy. Took me 6 tries to get it to work. If you want a better option, same folder in your LR Install as the eclipse is the Visual Studio plugin. Google how to use that and have fun with the object browser – fantastic.
Edit on last post.
My Setup:
first, I am using the Community 50 Vusers. Tomorrow when I get into work I will configure my test to run on our Enterprise Controller with full licenses to see how it work. Having said that.
Eclipse Neon 32 bit
Java 1.79
Follow the directions to install the plugin from IDE Add-Ins Dev (its the only plugin install location for eclipse)
THEN
Extract the JAR file from AdditionalComponents/IDE Add-Ins not the dev) to your eclipse dropin folder
restart eclipse
If you can’t add the api reference from the plugin, go to project properties and it will be at the bottom of the menu.
After that that -Joe’s steps worked (for me at least)
Doing this will also give you two options to creating a Vuser in Eclipse. Joe’s way and by creating a new Java project, expanding the LoadRunner node and choosing one of the LR Java protocols.(this option creates the vuser end, vuser start and action files.
Note on installing Neon (not an issue with Mars, Luna or Juno), if you have problems with creating a Virtual Machine, use Java 1.8 during install. When you create your Vuser Script in Eclipse, make sure you go to Window/Preferences/Java/Installed JRE’s and change it back to 1.7 – No matter what I tried I couldn’t get the plugin to work with 1.8.
Good Luck :)
Final Edit (yeah I am long winded).
If you are going the Visual Studio route, be aware that you are going from Selenium on Java to the C#, C++, .Net world (you will be using LR’s protocols for those, and not the Java protocols). You can still get Selenium to work in a C# world with a bit of finesse, but if you want pure Java with SE, stick with Eclipse. It’s worth the effort to get it working.
Hi, I am using LoadRunner 12.02, But there is no folder of Additional Components\IDE Add-Ins DEV. I have checked lot of time. Please help.
Thanks
hi Joe Colantonio
i ran script in eclispe succesfully using devopsvuser-?sample demo and it run sucessfully but i want to convert the script into vugen.for that i have go to microfoucus-> vugenscript converter-> add file and click on convert but i got below error.
got Failed to setup a valid runtime environment regasm returned the following exit code:100 .
any solution? my intention is to run the same scipt after converting ,then i will run on performance center not in controller.any suggetions?
is it possible to run the selenium tests which has cucumber framework in loadrunner? let me know.