Selenium is normally used for the automation of and end-to-end testing against a web application. But sometimes you may just want to automate some repetitive task that you do often to simply save yourself some time.
Or you can create an application that executes Selenium actions, but pauses after certain steps to allow you to visually inspect hard-to-automate, visually intensive activities. You can use Selenium for these types of tasks as well.
Reasons to create an automated test with manual steps
For example: I work for a large company, and we need to validate each tool that we use to tests our applications. In order to validate Selenium, we created a Java command line application that allows us to automate the verification process and manually visually inspect after action to verify that it actually worked.
To do this, we created a command line Java application that would launch a browser and enter text into a field then pause — which allowed us to verify that it performed the sendkey and entered the correct text. When a user hit the enter button, it would perform the next step then pause again, and so on.
Because of the type of validation we had to do, we needed an actual person, not a junit assertion, to verify that each step did, indeed, work.
I’m not sure how often you might actually need to use this technique, but if you use it only once it was worth the time it took to write this. To do this in Java, you can simply create a self-contained test and just pass someone the jar file.
Also – and this is one thing that has always annoyed me about QTP – a user cannot create a small, executable program that could run the test on another machine without having to have a full blown version of QTP on it.
With Selenium this isn’t a problem.
Let’s take a quick look at an example to show you what I mean.
Create an executable Selenium Java project
- Create a new java project named SeleniumExecutableExample. (I’m going to assume you already know how to set up a project in Java with Selenium. If not, follow my step-by-step post, Selenium 2.0 WebDriver – How to get started with Selenium and Java.)
-
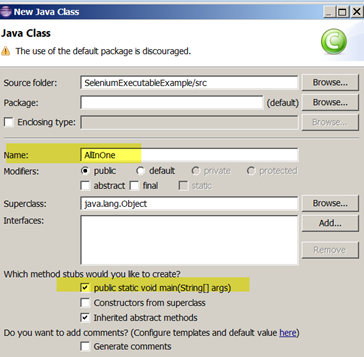
Once you have the project configured with the Selenium references, create a New Java Class called AllInOne and make sure it has a static main.
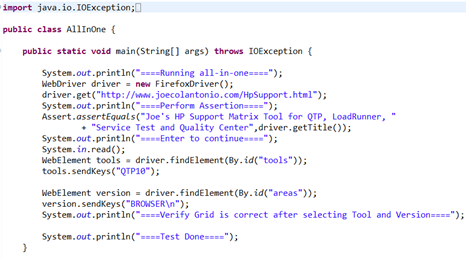
- Under The AllInOne’s main section, add the following code
- At the top of your SeleniumIEDriver class add the following namespaces:
import java.util.logging.Level;
import java.util.logging.Logger;
import org.junit.Assert;
import org.openqa.selenium.*;
import org.openqa.selenium.firefox.*;
- Next, under the main section of your AllInOne’s class, create an instance of the Firefox driver:
WebDriver driver = new FirefoxDriver();
- After we have an instance of the web driver, we can navigate to a web page using its get method:
driver.get("https://testguild.com/HpSupport.html");
- Verify the correct page has loaded using an assertion with the driver’s getTitle method:
Assert.assertEquals("Joe's HP Support Matrix Tool for QTP, LoadRunner, "
 + "Service Test and Quality Center",driver.getTitle());
- Next add some printout statements to the console and wait for the user to hit the enter key before running code that selects the tool and version :
System.out.println("====Enter to continue====");
System.in.read();
WebElement tools = driver.findElement(By.id("tools"));
tools.sendKeys("QTP10");
WebElement version = driver.findElement(By.id("areas"));
version.sendKeys("BROWSERn");
System.out.println("====Verify Grid is correct after selecting Tool and Version====");
System.out.println("====Test Done====");
- Your code should now look like this:
- Right-click on the AllInOne class and Run As > Java Application
- Hit f5 on your keyboard to refresh the project.
That’s it – nice and simple. Now let’s create an executable file for our test.
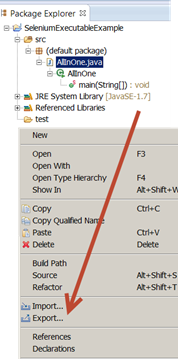
- Right-click in Eclipse under the Package Explorer and choose Export…
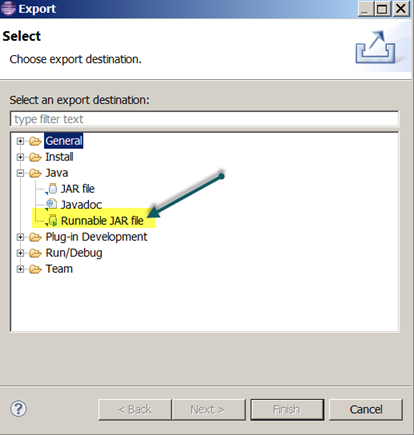
- In the Export dialog, select Java>Runnable JAR file
- Click Next>
- Under the Runnable JAR File Export dialog, select the AllInOne class under Launch configuration. Also select your export destination. (I’m just going to choose my TEMP folder on my C driver and name it AllInOne.) Also make sure that the Extract required option is selected.
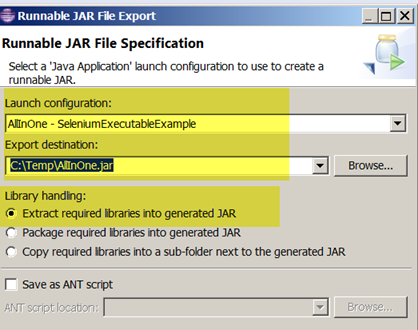
- Click on Finish
- Click OK on the Runnable JAR File Export dialog (ignore any warning you may have).

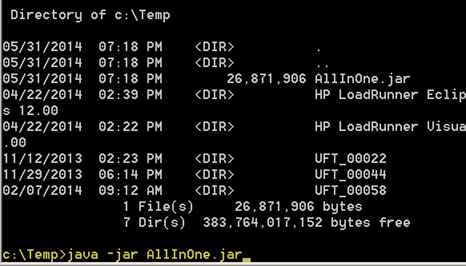
Run your jar Selenium file from the command line
- Open up a command prompt from Start>cmd
- Navigate to the directory where you saved your AllInOne.jar file.
- Type the following command to run your script:
> java –jar AllInOne.jar
- If everything goes well, the browser should start and navigate to my sample web page!
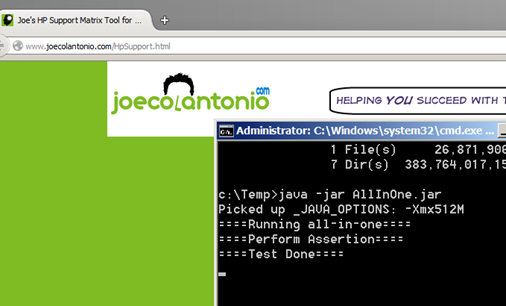
Cool – right!?
If you really want to prove that this works, go ahead and copy the jar file on another computer that has Java installed and run it there.
It should behave the same way.
There are a bunch of things you could do with this – I’ll leave it up to you to think of some cool ways to use it.

Joe Colantonio is the founder of TestGuild, an industry-leading platform for automation testing and software testing tools. With over 25 years of hands-on experience, he has worked with top enterprise companies, helped develop early test automation tools and frameworks, and runs the largest online automation testing conference, Automation Guild.
Joe is also the author of Automation Awesomeness: 260 Actionable Affirmations To Improve Your QA & Automation Testing Skills and the host of the TestGuild podcast, which he has released weekly since 2014, making it the longest-running podcast dedicated to automation testing. Over the years, he has interviewed top thought leaders in DevOps, AI-driven test automation, and software quality, shaping the conversation in the industry.
With a reach of over 400,000 across his YouTube channel, LinkedIn, email list, and other social channels, Joe’s insights impact thousands of testers and engineers worldwide.
He has worked with some of the top companies in software testing and automation, including Tricentis, Keysight, Applitools, and BrowserStack, as sponsors and partners, helping them connect with the right audience in the automation testing space.
Follow him on LinkedIn or check out more at TestGuild.com.
Related Posts

I’ve talked to a lot of people who claim their tool does “agentic testing.” Most of the time it’s a […]

What is Model Context Protocol (MCP) Model Context Protocol (MCP) is an open standard that lets AI agents — Cursor, […]
Look, I’ll be straight with you. I’ve been vibe coding in Cursor for about a year and a half, and […]

Here’s the thing about API testing tools: the list has exploded. What used to be “Postman or SoapUI?” is now […]