soapUI How to Post JSON to a REST Service

Since my previous post on How to Test a REST Web Service, I’ve received a few requests asking for an example using JSON. I originally wrote this in 2013 and wanted to see if it still worked.
In this post, I’ve shared:
- how to setup Apache CouchDB – a kind of authentication
- the updated steps for how to post JSON to a REST service using soapUI for 2022
INDEX
POST JSON to a REST service using soapUI
Setup – CouchDB
How to use soapUI to send JSON to a REST API|
Rest Easy
POST JSON to a REST service using soapUI
So as requested, here is a quick example of how POST JSON to a REST service using soapUI.
Setup – CouchDB
To make this example as easy as possible, without having to set up any sort of authentication, I’ve decided to use Apache CouchDB.
CouchDB is easy to install, stores data as JSON documents, and has an easy-to-use API to interact with it.
This makes it a great application to use to teach us more about REST testing with soapUI and JSON.
To install CouchDB go to:
-
- http://couchdb.apache.org/
- Click on Download and choose the version you want to us
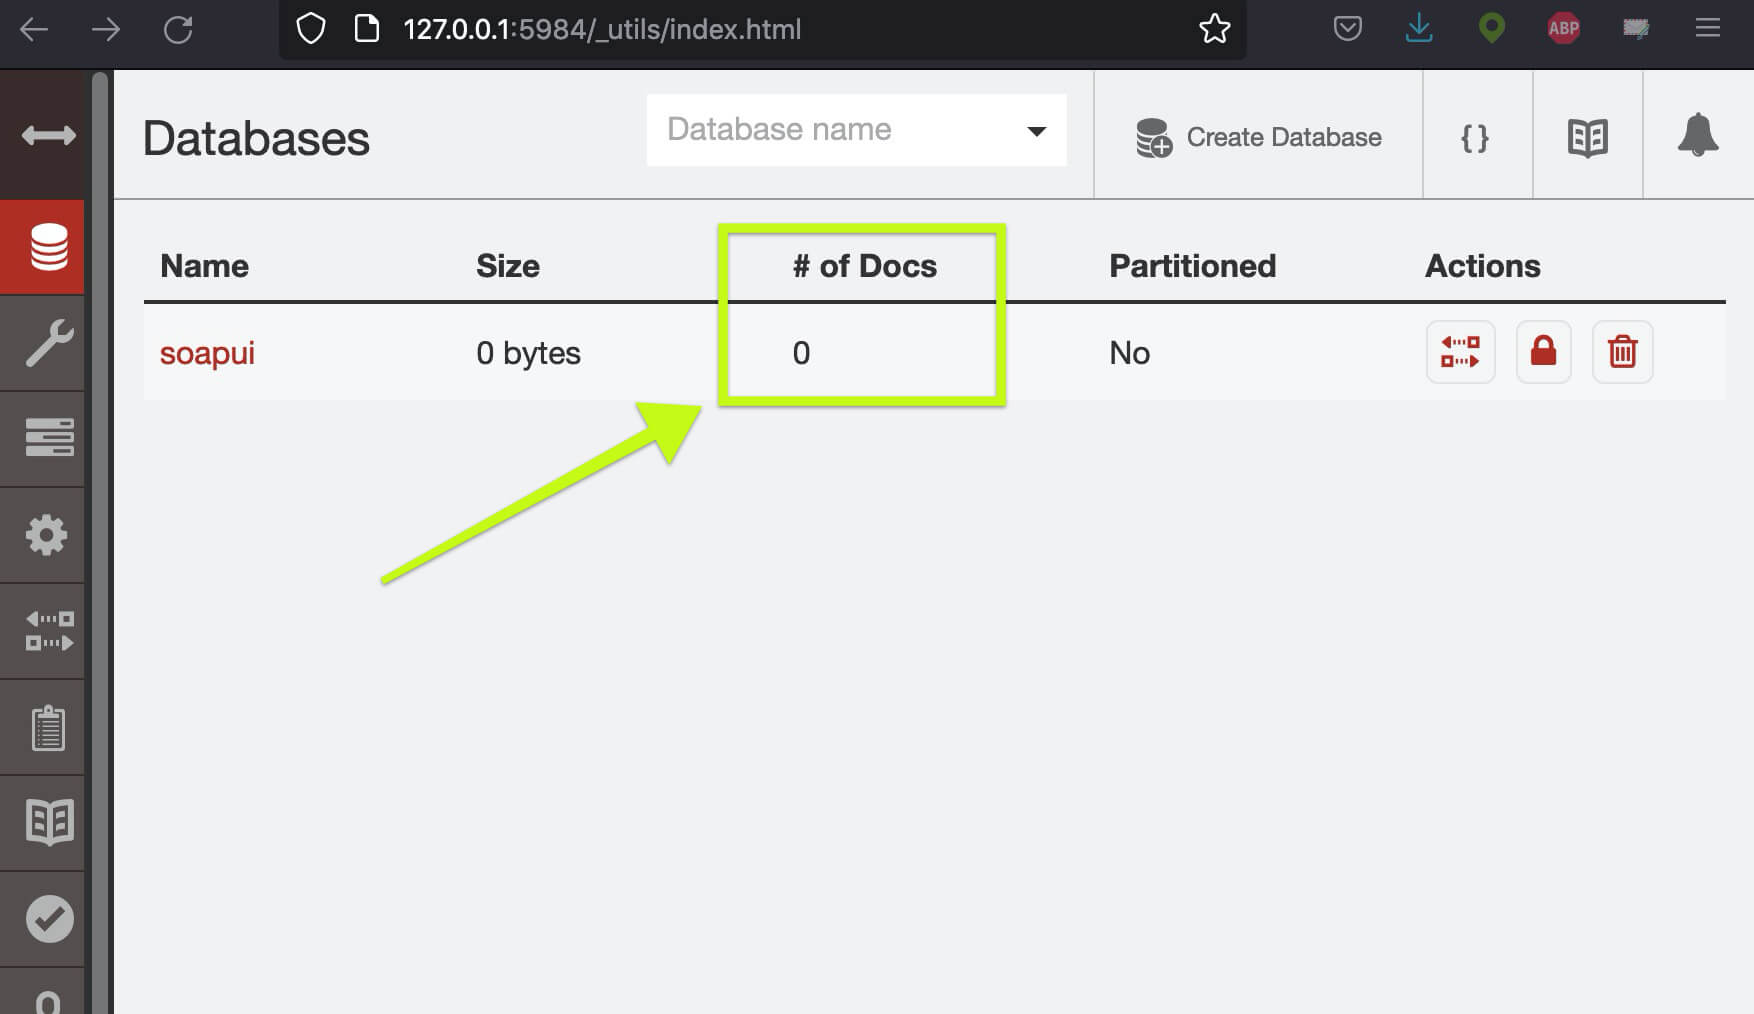
- Once it’s installed, enter http://127.0.0.1:5984/_utils/ in a browser. This should bring up your local CouchDB Futton website.
- Next, click on the Create Database and name it “soapUI.”
- Navigate back to http://127.0.0.1:5984/_utils/index.html. Notice that soapUI shows 0 docs.
Automation Testing Training Courses
How to use soapUI to send JSON to a REST API
Here are the steps to follow to get started using the free version of soapUI with REST testing:
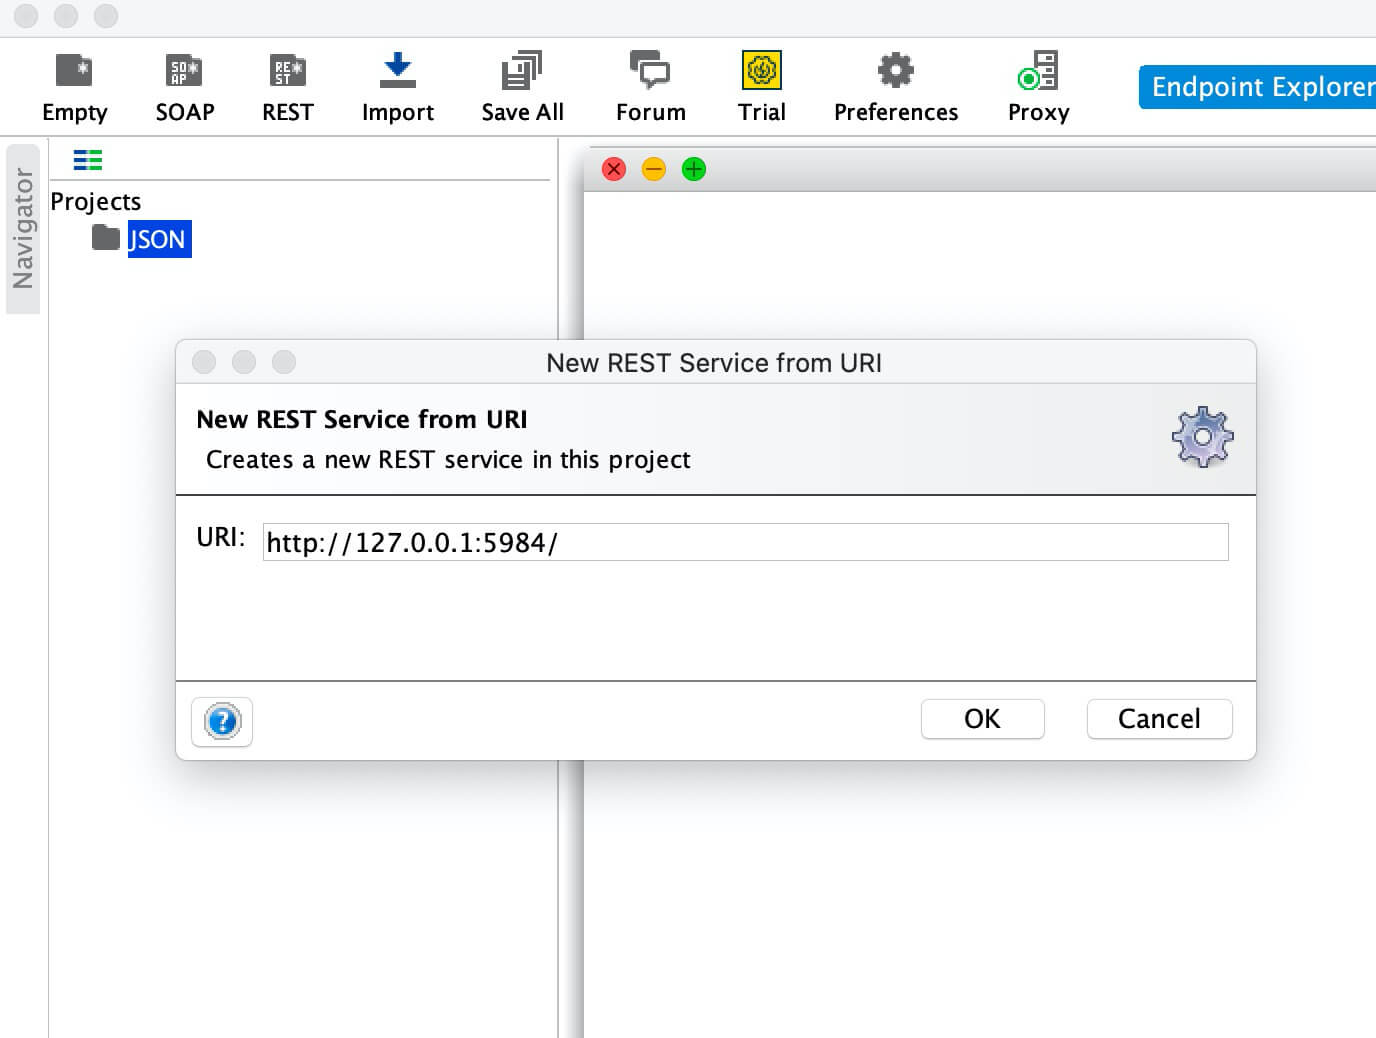
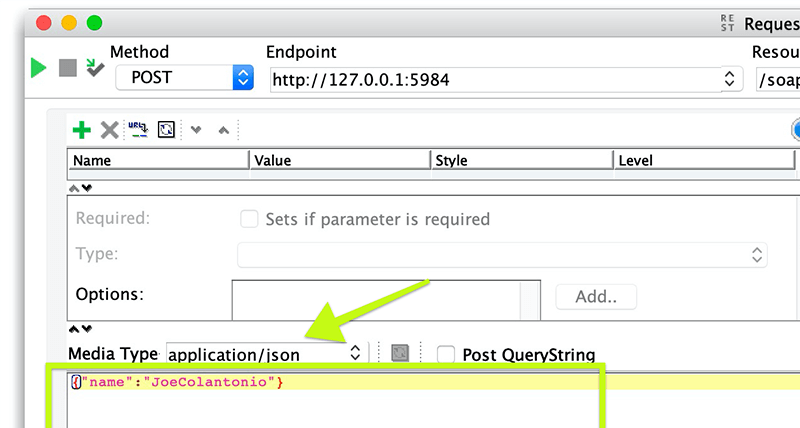
- Create a new empty project in soapUI. Enter Project Name: JSON. Click OK
- Right Click on the JSON project we just created and select New REST Service from URI
- In the New REST Service screen enter:
URI: http://127.0.0.1:5984/
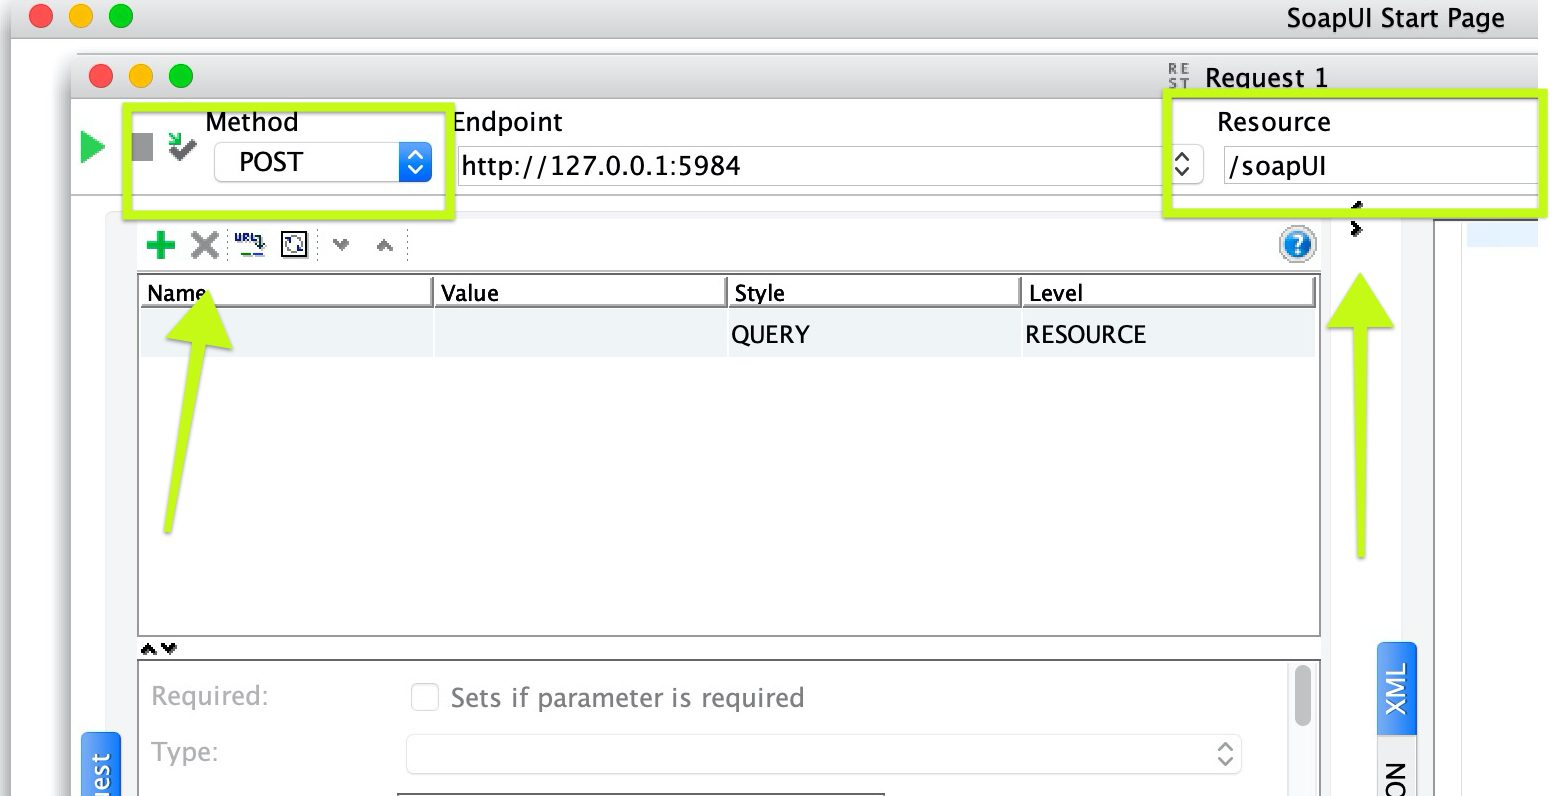
- In the Request 1 enter:
- Method: Post
- Resource: soapUI
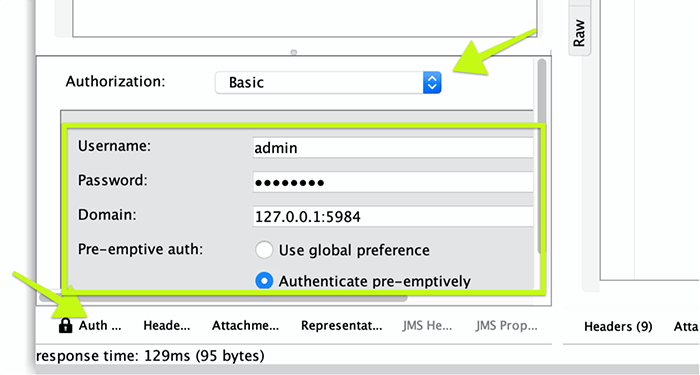
- This is where most people get confused – authentication.
If you setup a username and password for your CouchDB install, click on the Request 1 Authentication tab. From the Authorization drop–down, select Basic. Enter your username and password as well as the Domain: http://127.0.0.1:5984/. Make sure to also click on the Authenticate pre-emptively radio button.
7. Submit the Request 1. Notice in the response how it returns the value ok and an id
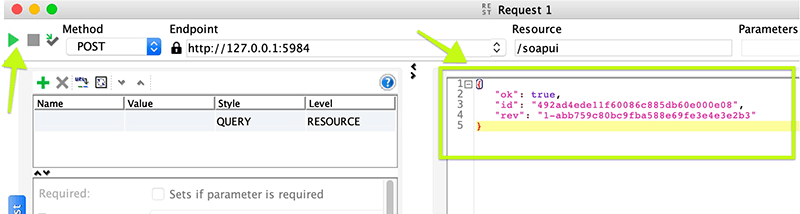
8. Go back to CouchDB. The soapUI DB should now have a value of 1 and should contain the name you just submitted:

Rest Easy
That’s it! You can now rest easy in the knowledge that you now know how to!

Joe Colantonio is the founder of TestGuild, an industry-leading platform for automation testing and software testing tools. With over 25 years of hands-on experience, he has worked with top enterprise companies, helped develop early test automation tools and frameworks, and runs the largest online automation testing conference, Automation Guild.
Joe is also the author of Automation Awesomeness: 260 Actionable Affirmations To Improve Your QA & Automation Testing Skills and the host of the TestGuild podcast, which he has released weekly since 2014, making it the longest-running podcast dedicated to automation testing. Over the years, he has interviewed top thought leaders in DevOps, AI-driven test automation, and software quality, shaping the conversation in the industry.
With a reach of over 400,000 across his YouTube channel, LinkedIn, email list, and other social channels, Joe’s insights impact thousands of testers and engineers worldwide.
He has worked with some of the top companies in software testing and automation, including Tricentis, Keysight, Applitools, and BrowserStack, as sponsors and partners, helping them connect with the right audience in the automation testing space.
Follow him on LinkedIn or check out more at TestGuild.com.
Related Posts

I’ve talked to a lot of people who claim their tool does “agentic testing.” Most of the time it’s a […]

What is Model Context Protocol (MCP) Model Context Protocol (MCP) is an open standard that lets AI agents — Cursor, […]
Look, I’ll be straight with you. I’ve been vibe coding in Cursor for about a year and a half, and […]

Here’s the thing about API testing tools: the list has exploded. What used to be “Postman or SoapUI?” is now […]